Showing posts with label SQL Server. Show all posts

Friday 12 February 2021

How to Encrypt and Restore Your SQL Server Database Backups

 We’ve had backup encryption out of the box since SQL Server 2014, yet I’ve rarely seen it used. In an age where we’re moving more and more things to the cloud including those backup files, backup encryption is becoming more and more necessary. Sure we have transport encryption and your cloud provider of choice most probably has an option for data at rest encryption but why leave any room for error? If you encrypt your backups on site before they leave you remove any margin of chance for potentially un-encrypted backups being stored somewhere.

One thing I have found is the documentation around this is a little bit disjointed and scattered over several different topics. This post is going to demo a full end to end solution of encrypting a backup on your source server and restoring it on your destination server along with some of the issues you may face on the way…

If you want to follow along you’ll need two different instances of SQL Server, I’m using SQL Server 2017 but the below should work on anything from 2014 onwards…

Source Server

On our source server, let’s create a new sample database with a couple of rows of data to test with…

     
CREATE DATABASE BackupEncryptionDemo
GO
CREATE TABLE BackupEncryptionDemo.dbo.Test(Id INT IDENTITY, Blah NVARCHAR(10))
INSERT INTO BackupEncryptionDemo.dbo.Test(Blah) VALUES('Testing')
INSERT INTO BackupEncryptionDemo.dbo.Test(Blah) VALUES('Testing2')

In order to encrypt a backup of this database we need either a certificate or an asymmetric key, I’m going to be using Certificates for the sake of this demo. When you create a certificate SQL Server encrypts it with a MASTER KEY before it gets stored so we’ll first need to create one of those…

     
USE master
GO
CREATE MASTER KEY ENCRYPTION BY PASSWORD = '(MasterKeyEncryptionPassword123)'

This key is then used to encrypt our certificate for storage…

     
CREATE CERTIFICATE SuperSafeBackupCertificate 
WITH SUBJECT ='Backup Encryption Certificate For Database1 and Database2'

Armed with our SuperSafe certificate we can now backup a database with encryption…

     
BACKUP DATABASE BackupEncryptionDemo 
   TO DISK = 'C:\keys\DatabaseBackup.bak'
   WITH ENCRYPTION(
      ALGORITHM = AES_256, 
      SERVER CERTIFICATE = SuperSafeBackupCertificate
   )
Backup Warning

Notice the helpful warning reminding us that we’ve not backed up our certificate. I cannot stress how important this is! If we lose that certificate then we won’t be able to restore any of our backups. The below TSQL will backup the certificate and a private key for its encryption, both of these files need to be put in a safe place where they will not be lost. The combination of these files and the password specified is all that’s needed to decrypt our backups so they need to be kept safe and in a real-world scenario should not be kept in the same place as the database backups…

     
BACKUP CERTIFICATE SuperSafeBackupCertificate 
   TO FILE = 'C:\keys\SuperSafeBackupCertificate.cer'
   WITH PRIVATE KEY(
      FILE='C:\keys\SuperSAfeBackupCertificate.ppk', 
      ENCRYPTION BY PASSWORD ='(PasswordToEncryptPrivateKey123)'
   )

If we then run another backup there will be no warnings…

     
BACKUP DATABASE BackupEncryptionDemo 
   TO DISK = 'C:\keys\DatabaseBackup2.bak'
   WITH ENCRYPTION(
      ALGORITHM = AES_256, 
      SERVER CERTIFICATE = SuperSafeBackupCertificate
   )

Now on to our first gotcha! If you run the above backup a second time you’ll get the following error…

Backup Error

Encrypted backups cannot append existing media sets like non-encrypted backups can, so you’ll need to write each one to a new set by specifying a different filename.

Destination Server

Now we have our encrypted backup, let’s try to restore it on our second server…

     
RESTORE DATABASE BackupEncryptionDemo 
   FROM DISK = N'C:\Keys\DatabaseBackup.bak' 
   WITH 
      MOVE N'BackupEncryptionDemo' TO N'D:\Data\EncryptionDemo.mdf', 
      MOVE N'BackupEncryptionDemo_log' TO N'D:\Data\EncryptionDemo_log.ldf'
Restore Error

We can’t restore it because it was encrypted with a certificate that we don’t yet have on this server and without this certificate the backup can’t be decrypted.

As before we can’t store any certificates without a master key so let’s get that created…

     
CREATE MASTER KEY ENCRYPTION BY PASSWORD = '(DestinationMasterKeyEncryptionPassword1234)'

Now lets see if we can restore that certificate backup we made on our new server…

     
CREATE CERTIFICATE SuperSafeBackupCertificate 
   FROM FILE = 'C:\Keys\SuperSafeBackupCertificate.cer'

At this point, depending on your credentials there is a good chance you will see an error similar to this…

Permission Error

This is because the NTFS permissions SQL Server put on the certificate and private key backup don’t give access to the service account your destination server is running under. To fix this open a Command Prompt window as Administrator and run the following command, replacing the username (MSSQLSERVER) with the account your server is running under and point it at the directory the backup keys are stored in…

     
icacls c:\Keys /grant MSSQLSERVER:(GR) /T

This will have now granted our SQL Server account read access to these files so let’s try restoring that certificate again…

     
CREATE CERTIFICATE SuperSafeBackupCertificate 
   FROM FILE = 'C:\Keys\SuperSafeBackupCertificate.cer'

That time it should go through with no error, so we now have our certificate and master key all setup, Let’s try restoring that backup again…

     
RESTORE DATABASE BackupEncryptionDemo 
   FROM DISK = N'C:\Keys\DatabaseBackup.bak' 
   WITH 
      MOVE N'BackupEncryptionDemo' TO N'D:\Data\EncryptionDemo.mdf', 
      MOVE N'BackupEncryptionDemo_log' TO N'D:\Data\EncryptionDemo_log.ldf'
Corrupt Key

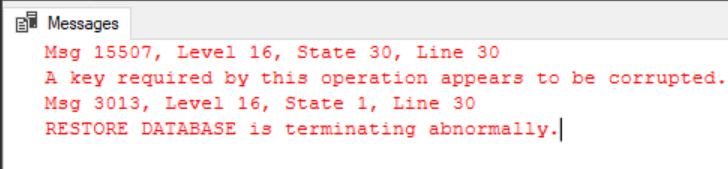
Still no luck, the restore failed because the keys we restored are corrupt. This is because when we restored the certificate we didn’t specify our private key and password file to decrypt it, let’s drop the certificate we restored and try again…

     
DROP CERTIFICATE SuperSafeBackupCertificate
GO

CREATE CERTIFICATE SuperSafeBackupCertificate 
   FROM FILE = 'C:\Keys\SuperSafeBackupCertificate.cer'
   WITH PRIVATE KEY(
      FILE ='C:\Keys\SuperSAfeBackupCertificate.ppk', 
      DECRYPTION BY PASSWORD='test'
   )
Invalid Password

Oops, we specified our password as ‘test’ when actually the password we specified when we backed up the private key was ‘(PasswordToEncryptPrivateKey123)’. We’re getting close now…

     
CREATE CERTIFICATE SuperSafeBackupCertificate 
   FROM FILE = 'C:\Keys\SuperSafeBackupCertificate.cer'
   WITH PRIVATE KEY(
      FILE ='C:\Keys\SuperSAfeBackupCertificate.ppk', 
      DECRYPTION BY PASSWORD='(PasswordToEncryptPrivateKey123)'
   )

We’ve now successfully restored our certificate, let’s try that database restore one last time!

     
RESTORE DATABASE BackupEncryptionDemo 
   FROM DISK = N'C:\Keys\DatabaseBackup.bak' 
   WITH 
      MOVE N'BackupEncryptionDemo' TO N'D:\Data\EncryptionDemo.mdf', 
      MOVE N'BackupEncryptionDemo_log' TO N'D:\Data\EncryptionDemo_log.ldf'
Successful Restore

Bingo!!!

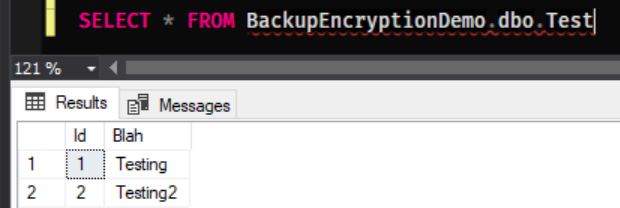
As one final check let’s query our only table

     
SELECT * FROM BackupEncryptionDemo.dbo.Test
Rows Restored

Wednesday 2 August 2017

Database diagram support objects cannot be installed -Fixed


I was creating database diagram during one KT , and faced this issue in dev environment.
As soon as I tried to open the database diagram I faced following error. It was known for me so resolved it quickly, but better to do documented it for future reference.

Error

Database diagram support objects cannot be installed because this database does not have a valid owner. To continue, first use the Files page of the Database Properties dialog box or the ALTER AUTHORIZATION statement to set the database owner to a valid login, then add the database diagram support objects.


Workaround / Fix / Solution Execute below scripts on database

  1. ALTER AUTHORIZATION ON DATABASE::<database name>TO sa
  2. Select your database -->Right Click -->Select Properties
  3. Select FILE in left side of box
  4. In the OWNER box, select user ‘sa’ or NT AUTHORITY\SYSTEM
  5. Click OK.


This should solve your problem.

Monday 16 June 2014

See SQL Server Backup File Date and Time

I want to be able to see when a backup file was created. Does SQL Server provide a way to add the current date and time to my backup file filenames?


SQL Server records the date and time inside the backup file, but to see the information, you have to look in the backup file by using the following statement:

RESTORE HEADERONLY FROM DISK =  N'c:\temp\TEST-201406-192507.bak'

image


This statement returns the BackupStartDate and BackupFinishDate as columns.


Another methods using history tables is given below.


SELECT [rs].[destination_database_name]
,[rs].[restore_date]
,[bs].[backup_start_date]
,[bs].[backup_finish_date]
,[bs].[database_name] AS [source_database_name]
,[bmf].[physical_device_name] AS [backup_file_used_for_restore]
FROM msdb..restorehistory rs
INNER JOIN msdb..backupset bs ON [rs].[backup_set_id] = [bs].[backup_set_id]
INNER JOIN msdb..backupmediafamily bmf ON [bs].[media_set_id] = [bmf].[media_set_id]
ORDER BY [rs].[restore_date] DESC

However, this method doesn't let you easily identify when a backup file was created.Many people want to display the date and time in the file system name of the backup file so that they can easily see the backups ordered in time.Following scripts creates a dynamic SQL statement that makes a backup of a database and encodes the current date and time in the backup filename.The script creates a filename for the backup in the format databasename-YYYYMMDD-HHMMSS .bak. In addition, the script adds a leading zero to the time elements (hours, minutes, and seconds) so that 1:02 A.M. shows as 010200 instead of 10200.The leading zero ensures that the filenames will sort in the correct order in the file system. Note that the script assumes the C:\backup directory exists, so you need to change the directory to put the filenames into the correct path for your environment.


DECLARE @FileName NVARCHAR(256)    ,@NSQL NVARCHAR(4000)
SELECT @FileName = 'c:\temp\'
+ db_name()
+ N'-' + CONVERT(NCHAR(6), getdate(), 112)
+ N'-' + right(N'0' + rtrim(CONVERT(NCHAR(2), datepart(hh, getdate()))), 2)
+ right(N'0' + rtrim(CONVERT(NCHAR(2), datepart(mi, getdate()))), 2)
+ right(N'0' + rtrim(CONVERT(NCHAR(2), datepart(ss, getdate()))), 2) + N'.bak'
PRINT @FileName
SELECT @NSQL = 'BACKUP DATABASE ' + QUOTENAME(db_name(), '[') + ' TO DISK = ''' + @FileName + ''''
PRINT @NSQL
EXEC (@NSQL)
Reference http://www.mssqltips.com/sqlservertip/1150/what-is-in-your-sql-server-backup-files/
 

Friday 3 January 2014

SQL Server 2012 FileTable

In a series of blog posts we will have a look at the new SQL Server 2012 table type called FileTable. This first blog post will be a simple getting started – how to create a FileTable and how to dump files into the folder and do some simple file manipulation.
A SQL Server FileTable is a special table where you can store directory and files – that’s not special I know, the special thing is that you can access these files and directories from windows applications as if they were stored in the file system.The data stored in the FileTable is exposed to windows through a windows share, and via this share it is possible to gain non-transactional access to the data.If you create or change a file through the windows share the command is intercepted by a SQL Server component and the changes are applied to the corresponding data in the FileTable.
Let’s create a demo database with a FILESTREAM filegroup, I’ll be setting the NON_TRANSACTED_ACCESS to FULL this gives me full non-transactional access to the share, this option can be changed later if you want to do that. Here is the code:
    CREATE DATABASE FileTableDB
    ON  PRIMARY  
    (  
        NAME = N'FileTableDB',  
        FILENAME = N'C:\Program Files\Microsoft SQL Server\MSSQL11.SQL2012\MSSQL\DATA\FileTableDB.mdf'  
    ),  
    FILEGROUP FilestreamFG CONTAINS FILESTREAM      
    (  
        NAME = MyFileStreamData,  
        FILENAME= 'C:\Program Files\Microsoft SQL Server\MSSQL11.SQL2012\MSSQL\DATA\Data'  
    )  
    LOG ON  
    (  
        NAME = N'MyFileTableTest_Log',  
        FILENAME = N'C:\Program Files\Microsoft SQL Server\MSSQL11.SQL2012\MSSQL\DATA\FileTableDB_log.ldf'  
    )  
    WITH FILESTREAM  
    (  
        NON_TRANSACTED_ACCESS = FULL,  
        DIRECTORY_NAME = N'FileTable'  
    )  


That’s the database done, now let’s create the magic table – that is simple done with the “AS FileTable” keyword. When creating a FileTable there is only two options that you can change, everything else is out of the box. Let’s have a look at how I created the table:
    USE FileTableDB  
    GO
      
    CREATE TABLE MyDocumentStore AS FileTable  
    WITH  
    (  
        FileTable_Directory = 'FileTableDB',  
        FileTable_Collate_Filename = database_default  
    );  
    GO  


If we take a look at the GUI after creating the table, we can see that the table is created under the new folder called FileTables

image


that is not the only new thing, if we right click at the table that we just created we will see an option called “Explore FileTable Directory” – click that and a windows opens with the content of your FileTable. If you drop a file into this folder it will be accessible from SSMS, with a simple SELECT from the MyDocumentStore.

Here is how the folder looks:

image

And if you query the table you get the following: (This query only shows a few of the columns off the table)

image

Now you can do file manipulation with SSMS, something like renaming the files is just an update statement.

Thursday 24 October 2013

Microsoft SQL Server 2012


Consider Windows Server 2012 for SQL Server installations.
Here are some important reasons to consider Windows Server 8 as the operating system of your next SQL Server installations.

Contained Databases in SQL Server 2012.
It is a new feature in SQL Server 2012 that makes easier to move databases between instances of SQL Server.

Expired Evaluation Edition / Product Key Change.
Learn what to do when the evaluation period for your SQL Server 2012 expires or what to do to change the product key of a SQL Server instance.

Fourteen New Transact-SQL Functions and One Improved.

SQL Server 2012 brings fourteen new T-SQL functions and improved another one.

How to install SQL Server 2012.

Learn how to install a standalone instance of SQL Server 2012. Resources, recommendations, software requirements and hardware requirements, common error messages, step-by-step installation procedure.

How to Install SQL Server 2012 on Windows Server Core.
SQL Server can now be installed on Windows Server Core.

How to use Product Updates on SQL Server 2012.
Learn how to integrate the original SQL Server 2012 media with a cumulative update, a service pack, or both at the same time.

Migrating SQL Server databases to Azure using SSMS 2012.
Learn how to migrate SQL Server databases to a Windows Azure Database Server using SQL Server Management Studio 2012.

New User-defined Server Roles.
Starting SQL Server 2012, user-defined server roles can be created and configured with specific permissions as required by the business needs.

Startup Parameters Tab.
SQL Server 2012 brings a new and easy way to configure startup options for the database engine.

Restore - Timeline.
When a point-in-time restore is needed on SQL Server 2012, open the "Restore Database" dialog, and click on the "Timeline" button.

Using Offset and Fetch with the Order By Clause.

Using the Offset and Fetch arguments of the Order By clause to implement a query page solution.

What is LocalDB?
What is SQL Server 2012 Express LocalDB RC0?


What SQL Server components or features are installed?

Use the Discovery Report that is located on the SQL Server Installation Center.

WITH RESULT SETS option.
You can use the WITH RESULT SETS option when you want to execute a stored procedure and would like to change or override the result set returned by the stored procedure.

SQL Server 2014 CTP1

Compatibility 120 Level is not available on CTP1.
Msg 15048, Level 16, State 1, Line1. Valid values of the database compatibility level are 90, 100, or 110.
Microsoft SQL Server 2014 CTP1 Requirements.
This article describes some requirements to should be met before installing SQL Server 2014 CTP1.

Windows Update offers to apply SQL 2102 SP1 on SQL 2014.
Why is Windows Update offering to apply SQL Server 2012 SP1 on a computer that only has SQL Server 2014 CTP1 installed.
SSDT is not available on SQL Server 2014 CTP1.
SQL Server Data Tools cannot be installed using SQL Server 2014 CTP1 setup, and should be downloaded from Microsoft Download web site and installed on a computer where SQL Server 2014 is not installed.

Tuesday 22 October 2013

Database Snapshots–SQL Server

Applies to: Microsoft SQL Server 2005 Enterprise and later.
Introduction.
This article provides a summary of the information available on Microsoft SQL Server Books Online about Database Snapshots.
Definition.
A snapshot is read-only, static view of a database.
Useful scenarios.
clip_image001 Snapshots can be used in conjunction with database mirroring for reporting purposes. You can create a database snapshots on the mirror database and direct client connection requests to the most recent snapshot.
clip_image001[1] Maintaining historical data for report generation. You can create a database snapshot at the end of a given time period (such as a financial period) for later reporting.
clip_image001[2] Safeguarding data against administrative and user error. A database can be reverted back to the state it was in when the snapshot was created. Reverting is potentially much faster for this purpose than restoring from a backup.
clip_image001[3] In a test environment, it can be useful to quickly return a database back to the state it was prior a test run.

When not to use database snapshots.
clip_image001[4] Database Snapshots should not be seen as high availability option.
clip_image001[5] Database Snapshots should not be seen as an alternative to regular backups of your data. Database snapshots can not protect your databases against disk errors or database corruption.

Some important considerations about database snapshots.
clip_image001[6] Snapshots can be created very quickly.
clip_image001[7] Available in SQL Server 2005 Enterprise Edition and later.
clip_image001[8] You cannot used SQL Server Management Studio for creating a database snapshots. Snapshots have to be created using T-SQL.
clip_image001[9] You cannot make a backup of a Snapshot.
clip_image001[10] All recovery models support database snapshots.
clip_image001[11] Snapshots are read only, static-view of a database.
clip_image001[12] Only users existing in the source database at the time a snapshot is created can have access to the data in the snapshot.
clip_image001[13] Performance is degraded because Snapshot add I/O overhead. Updates to the source database imply updates to the sparse files of every snapshot the source database has.
clip_image001[14] Snapshots depend of the source database. Snapshots must reside on the same instance as the source database, because they share data pages as well as the same buffer cache.
clip_image001[15] A database can have multiple snapshots.
clip_image001[16] Every database snapshot persist until explicitly dropped.
clip_image001[17] Every time you defragment the source database all pages involved in the defragment operation should be sent to the snapshot, and that will make it grow in size.
clip_image001[18] Full text indexes are not available in snapshots.
clip_image001[19] Snapshots tend to fragmentation at file system level.
clip_image001[20] Snaphots can be marked suspect if the drive hosting the snapshot runs out of space while updating the snapshot.
clip_image001[21] Each database snapshot is transactionally consistent with the source database as of the moment of the snapshot's creation.
clip_image001[22] If the source database becomes unavailable, all of its database snapshots also become unavailable.
clip_image001[23] Snapshots of the model, master, and tempdb databases are prohibited.
clip_image001[24] You cannot drop files from a database snapshot.
clip_image001[25] You cannot attach or detach database snapshots.
clip_image001[26] You cannot create database snapshots on FAT32 file system or RAW partitions.

Planning for Database Snapshots.
clip_image001[27] Database snapshots operate at the data-page level. Before a page of the source database is modified for the first time, the original page is copied from the source database to the snapshot. Therefore, it is useful to know the typical update patterns for a database when planning how much space is required during the planned lifespan of a snapshot. The maximum size to which a snapshot' sparse file can grow is the size of the corresponding source database file at the time of the snapshot creation
clip_image001[28] Create a naming convention for creating snapshots that includes the creation date and time of the snapshot. Books Online suggest that a good naming convention should also include the name of the source database and an indication that the new name is for a snapshot.
clip_image001[29] Database snapshots can be created only on a NTFS file system.
clip_image001[30] To use a database snapshot, clients need to know where to find it. When you substitute a new snapshot for an existing one, you need to redirect clients to the new snapshot, and that should be done with some programming.
clip_image001[31] Reverting breaks the log backup chain. For that reason, Microsoft recommends a full database backup after finishing the revert operation.

Creating a Database Snapshot.
Here is a sample database snapshot create script on the AdventureWorks database.
CREATE DATABASE AWDB_Snapshot_20080522 ON (
NAME = AdventureWorks_Data,
FILENAME = 'C:\Program Files\Microsoft SQL Server\MSSQL.1\MSSQL\Data\AWDB_Snapshot.ss')
AS SNAPSHOT OF AdventureWorks;
Open SQL Server Management Studio, and then open the Query Editor, copy/paste the above script in the Query Editor, and execute it pressing F5.
clip_image002
clip_image003
Make a right click over "Database Snapshots", and select "Refresh", to see the newly created database snapshot.
clip_image004

clip_image005
Considerations for reverting to a Database Snapshot.
clip_image001[32] Reverting does not work in an offline or corrupted database
clip_image001[33] Reverting does not work when the source database contains any read-only or compressed filegroups.
clip_image001[34] Reverting does not work when any files are offline that were online when the snapshot was created.
clip_image001[35] Only the snapshot that you are reverting can exist.
clip_image001[36] During a revert operation, both the snapshot and the source database are unavailable.
clip_image001[37] Before you can take log backups of the reverted database, you must first take a full database backup.
clip_image001[38] Reverting to a snapshot drops all the full-text catalogs on the source database.

Procedure for reverting to a Database Snapshot.
1. Identify the database snapshot to which you want to revert the database using SQL Server Management Studio
2. Drop any other database snapshots.
3. Perform the revert operation. To revert the database, use the following Transact-SQL statement:
RESTORE DATABASE <database_name> FROM DATABASE_SNAPSHOT = <database_snapshot_name>
4. If the database owner changed since creation of the database snapshot, you may want to update the database owner of the reverted database.
5. Start the database.
6. Optionally, back up the reverted database, especially if it uses the full (or bulk-logged) recovery model.
Reverting to a Database Snapshot.
To revert the AdventureWorks database to the database snapshot we created before, use the following T-SQL command:
USE master;
-- Reverting AdventureWorks
-- to AWDB_Snapshot_20080522
RESTORE DATABASE AdventureWorks
FROM
     DATABASE_SNAPSHOT = 'AWDB_Snapshot_20080522';
GO
clip_image006
References.
Database Snapshots
SQL Server 2008 Books Online (October 2007)
Database Mirroring and Database Snapshots
SQL Server 2008 Books Online (October 2007)
http://www.sqlcoffee.com/Tips0004.htm
http://technet.microsoft.com/en-us/library/ms189940%28v=sql.105%29.aspx


Azure AzCopy Command in Action

Azure AzCopy Command  in Action -  Install - Module - Name Az - Scope CurrentUser - Repository PSGallery - Force # This simple PowerShell ...